Secrets for the best pizza recipe
Last updated on November 12th, 2023 at 06:58 pm
At the end of this article I will be giving one of my favorite pizza recipes. However I want to make sure you understand that making pizza is not just about weigh ingredients and mix them, it’s a process. I already gave you some insights about it. I am now sharing secrets for the best Pizza recipe because I want to challenge you.
Will you be able to use my recipe and make the exact same pizza three times in a row?
I am confident you will. Anyway in this article I will be sharing my secrets for the best Pizza recipe making. From my point of view, especially for making pizza at home they will help a lot. In fact we need to consider that at home we don’t prepare pizza every day. Therefore is a bit harder to reach consistent results (better: just takes longer).
-
How to make pizza at home fundamentals
Everything starts with two critical decisions. The first is the kneading method: direct or indirect. Especially for beginners the choice is easy and it has to be the direct method. We will discuss about reasons in another blog post.
Once you know what method you use it’s time to select your ingredients, starting from the flour. Firstly you want to get to know the behavior of the flour. So avoid to mix different types and brands and try to stick – at the beginning at least – with usage of 100% of same flour.
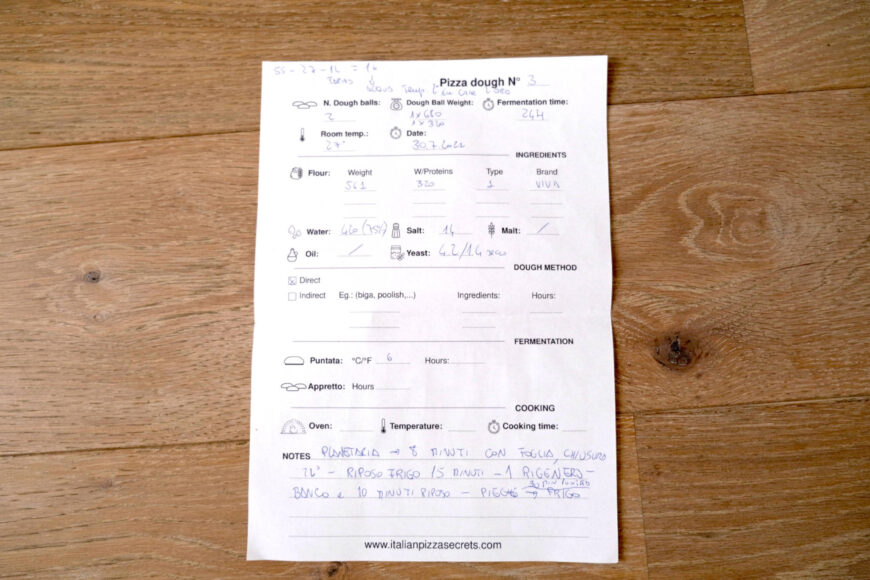
And now the critical part: take notes of everything! If you subscribed to my newsletter you received already a free notebook. If you don’t have it yet, don’t waste other time and get it! It’s free:
You can’t imagine the difference in your making pizza progress when you take note of ingredients and process. Even though is a bit time consuming it will pay off. Moreover after a few months you will end up with a great book of pizza recipes 🙂
-
Always measure temperatures
We discussed the importance of temperatures in the pizza dough already. Let’s extend the topic to the entire pizza making process. More in details, when do you want to control temperatures? The answer is: always. For a consistent result you want to make sure that the critical parts of the process are having the same weather.
I personally take temperatures in the following phases:
- water before kneading
- flour temperature if I used the fridge, again before kneading
- during the full kneading process to stay within certain range of temperatures
- when I move the dough in fridge for puntata
- during the cooking phase I take note of the oven temperature I used
What is the take away for you? Get a food thermometer or a pyrometer!
-
Take note of the time of each step of the pizza making process
To somebody sounds obvious. In a lot of pizza recipes you are provided with rising time, sometimes kneading time, cooking time and so on. But the truth is that you can never know in advance the exact time a recipe will take unless you did the same process in your environment several times.
Classic example is the rising phase time. This is influenced by a lot of variables, starting from the room temperature you have the day you prepare your pizza. Therefore what I recommend is to first estimate times but then measure them. In my notebook you have some fields dedicated to time. However I strongly recommend you to enrich the notes adding more details.
I personally find that is key to measure the following time:
- kneading time in the stand mixer
- time spent in puntata
- duration of appretto
- how much time the dough takes to cook in oven
I can assure you that if you start to be precise with what you are doing everything will be much better and easier.
-
Write all steps you follow during kneading process
My suggestion is to write down what you did while keading. To give you some examples, you want to remember about:
- Stop&go, if used, for how many times and for how long
- Slap&fold, remember to have a note about how many times you do it and with breaks
- Always refer to the calendar date and weather conditions, especially when it’s summer
In conclusion, the more you write what you do, the more you succeed over time. I know that this may be a tedious and time consuming activity. However take it from the positive side: you will soon have a very detailed book of pizza recipes!
From my side I can tell you that sharing secrets for the best pizza recipe requires to give you also less pleasant instructions 🙂
-
Sharing secrets for the best Pizza recipe: conclusion and pizza recipe
I am sure you read until now to taste this moment: the pizza recipe. Firstly let me thank you for your patience. It is now time to move ahead.
This is one of my favorite pizza recipes. You can use it for your Pizza Pan, the one that you cook in the sheet pan for your standard home oven. I will give you amount of ingredients that you can use for two sheet pans, 1 30×40 cm and 1x 20×30 cm.
| Ingredient | Amount | Note |
|---|---|---|
| Flour Type 0 or Type 1 | 560 gr | You need a strong flour, 300W is the minimum recommended |
| Water | 420 gr | Use cold/almost ice water |
| Salt | 14 gr | |
| Yeast | 4 gr | If you use dry yeast divide by 3 |
-
Step by step Italian pizza recipe
And here is the step by step process. Just remember, this is a challenge. You will always need to adjust as per your needs.
| Step | Action | Expected time | Note |
|---|---|---|---|
| 1 | Put Flour, Yeast and 85% of water in the bowl | - | Do not add salt now, keep 15% of water out, in fridge |
| 2 | Start kneading at low speed until the flour takes all water | 1-2 min. | |
| 3 | increase the speed to medium level | 2-3 minutes | If you notice that the dough is tough already you can anticipate next step |
| 4 | Start adding 10% of remaining water (read notes!!) | few minutes | Add very low amount of water at a time: wait for the dough to clean the bowl before introducing more. Have patience here not to fail!! There is no rush! Also: after adding water try to increase the speed of the mixer to maximum speed |
| 5 | When water from step 4 is all taken add salt | 20 seconds | |
| 6 | After salt is almost completely absorbed finish to put remiaining water in same way as point 4 notes | 1-3 minutes | Add very low amount of water at a time: wait for the dough to clean the bowl before introducing more. Have patience here not to fail!! There is no rush! Also: after adding water try to increase the speed of the mixer to maximum speed |
| 7 | Put the mixer at maximum speed (read careuflly notes and step 8) | - | You want that the dough does not stick to bowl anymore and goes all around your hook (pay attention to dough temperature!! Read Step 8) |
| 8 (optional) | Measure dough temperature and if above 23 celsius degrees stop kneading for 15 minutes | 15 minutes | If room temperature is higher than 23 °C cover the bowl and put it in fridge. In any case you apply stop and go make sure you cover the bowl |
| 9 (optional) | After Stop&Go, put the mixer speed at minimum, start the mixer so that the dough goes from the bowl to all around the hook | few seconds | It's important that you don't keep kneading, just have the dough to stick to the hook |
| 10 (optional) | Remove the dough from the hook and repeat step 9 after 15 more minutes) | few seconds | It's important that you don't keep kneading, just have the dough to stick to the hook |
| 11 | Move the dough to a smooth table and wait for 5 minutes | 5 minutes | |
| 12 | Apply first Slap&fold and then wait 15 minutes | few seconds | Stop Slap&fold immediately after the dough is not elastic anymore |
| 13 | Apply Second Slap&Fold and then wait for 10 minutes | few seconds | Stop Slap&fold immediately after the dough is not elastic anymore |
| 14 | Do "Pirlatura" (make the dough ball rounded and create tension on dough surface) | few seconds | If you don't know about Pirlatura or Folding (Slap&Fold) click this link |
| 15 | Move the dough in a container with lid | 20 hours in fridge | The dough goes covered in fridge for 20 hours. If the room temperature is not too high it is recommended to keep the dough in the container 30 to 60 minutes at room temperature before going to fridge |
| 16 | Take dough from fridge, wait for 30-60 minutes and then prepare 2 dough balls for the last fermentation | 40-80 minutes + 4 hours | Dough balls are 1x680gr and 1x320gr |
If you have questions or comment you can always contact me!
Did you like this blog post? Leave me a comment and share it on social media! You can also subscribe to my newsletter to be notified about upcoming pizza secrets sharing:


